Cooler Buddy - A Smart Fan
The repo for this project can be found here.
This project was made for my Internet of Things class in Fall 2020. I’ve never played with an Arduino or Raspberry Pi before, so learning the interface of an Arduino was new and interesting. The class that I built this project for was also pretty fun. I got to build a lot of cool things and I’ll possibly continue using Arduinos in the future.
Cooler Buddy is a fan that takes the current environment’s temperature and adjust its fan speed accordingly. I created two settings to the fan: auto-mode and manual mode. The fan that I chose to use was Arctic F12 PWM. It took a while for me to figure out the schematics of the fan since I knew it required an external power source, but I didn’t know how or what to power it with. I ended up buying a 12V AC/DC adapter that connects directly to the fan so no 12 volts would be used for the Arduino. I wanted to add more sensors to the project, but I didn’t have a lot of pins left on my shield.
Materials/Device List
- 12V AC/DC Adapter
- Arctic F12 PWM Fan
- Arduino Uno
- Blue LED Bulb
- Breadboard
- ESP8266-01
- Grove - Temperature Sensor
- Grove - Touch Sensor
- Grove - Base Shield
- Grove - 16x2 LCD RGB Blacklight LCD Display
- Jumper Cables (15)
- Resisters (1k and 10k ohm)
Fan Setting
Auto Mode (Default):
Currently, the fan changes it’s speed when it detects or reaches a certain temperature.
- Below 80 degrees, default speed (~500 rpm)
- 80-85 degrees, low speed (~800 rpm)
- 85-90 degrees, medium speed (~1100 rpm)
- Above 90 degrees, max speed (~1350 rpm)
Manual Mode:
When the touch sensor has been activated, manual mode is started. This mode overrides auto-mode
and must be set back to the default speed to return to auto-mode. A mode number will be displayed
on the LCD display starting from 0 (default speed) and goes up to 3 (max speed).
Design/Schematics

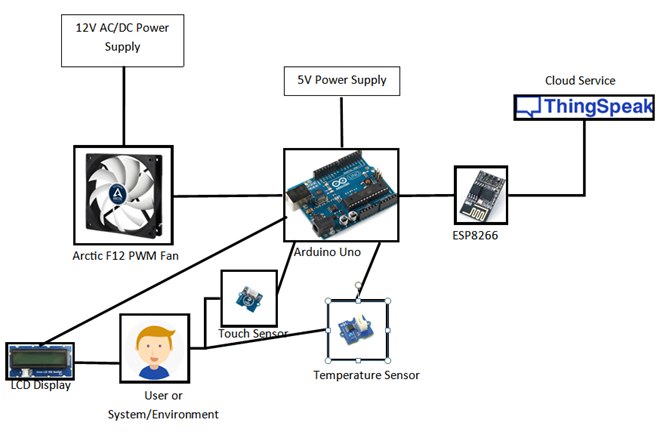
The above image shows the system design. It does not show the LED light that I’ve added for the touch sensor. As mentioned above, there is a 12V power source that powers the Arctic fan. The Arduino is powered through USB from the computer so it only uses a 5V power.
There’s a lot of things connected to the Arduino Shield. The tachometer pin and PWM pin of the Arctic fan is connected to 2 digital pins of the Arduino. The LCD display is connected to the Arduino using I2C connection. The touch sensor is connected to a digital pin while temperature sensor is connected to an analog pin. The LED light on the breadboard is also connected to a digital pin on the Arduino. The ESP8266 WiFi module is connected to the 3V of the Arduino and other digital pins. The ESP8266 sends the temperature and fan speed to ThingSpeak every 20 seconds.
Problems and Future Revisions
Since I’m using ThingSpeak’s free account, I am limited to sending data every 15 seconds, but for this project I set that to 20 seconds instead. This is a huge disadvantage for this project because temperature can change every second. So there’s a lot of information that is lost within the 20 seconds the data is being uploaded. In the future, I’m going to host/build my own service to remove the delay.
Another problem is that there is no “on/off” switch for the fan. It must constantly remain on. I think it has to do with the fan itself because it’s a computer fan and it must be constantly running. There’s probably no easy fix to this, but I’ll look into it into the future.
Another problem is how the fan speeding is set to specific temperatures. It would be better if a user can set the fan speeds by mapping instead of hardcoding specific temperatures.
The End

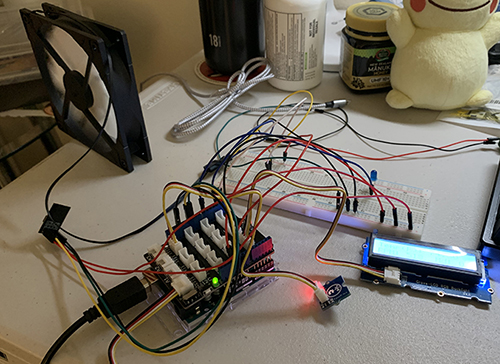
The above image is what it Cooler Buddy looks like. I’d like to clean up the wires in the future and possibly put the fan in a case. It was very fun working and learning about internet of things and messing with an Arduino. I definitely want to work more with these hands on projects.
